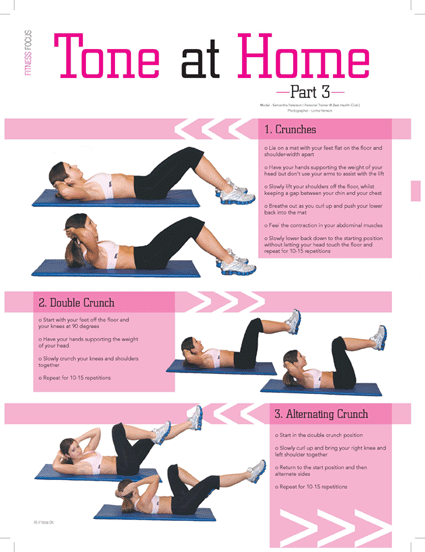
Tone at Home

So I found these really cute "Tone at Home" workouts that come in parts one, two, and three. I hope you try them out!


Comments

Popular posts from this blog

Guest Post: DIY Desk Calendar

This week I had the pleasure of hosting my friend Anina for a guest blog post! Anina is a freshman at NC State studying graphic design, she loves to bake, and travel!  I have known her throughout Middle School and High School, and I have loved watching her grow flourish in terms of herself, as well as her Blog and Youtube channel! Hang around until the end of the post for all of her links, and I hope you all enjoy! DIY Desk Calendar   What You’ll Need: Small, wooden box White paint 1 sheet of patterned paper Ruler 3 small C-hooks 13 White gift tags Modge podge Watercolors & brush Pencil Scissors Metallic paint Directions: First, take the lid off of your box. You won’t be needing it. Then paint your box white. If you found a box that was already white, you can skip this step.  While waiting for your box to dry, decorate the 13 gift tags with water color. You can do this however you want, but I p...

Would You Rather...? TAG

So what do you guys think of me doing TAG posts? Yes? No? Annoying? Maybe? Email me some feedback! :) 1. Would you rather go out with messy hair and nice make-up or nice hair and no make-up? Messy hair, nice makeup 2. Would you rather shave your eyebrows or have your eyelashes fall out? Eyelashes fall out... You could use falsies! :) 3. Would you rather be forced to shop at only MAC or Sephora for the rest of your life? Sephora! More options! 4. Would you rather wear lipgloss/lipliner look or an 80's perm? Hmmmm... Lipgloss and Lipliner? 5. Would you rather leave the house with obvious foundation or overdone blush? Overdone blush, it wears off quicker! 6. Would you rather wear MC Hammer pants or Biker Shorts in public? Ick... Biker Shorts i guess? 7. Would you rather have a bad orange-y spray tan or weird tan lines you can't cover up? Weird tan lines! You could make up an awesome back story on the insane things you did to get them! 8...

DIY Melted Crayon Ornaments!

Supplies: Clear Glass Balls (mini or large!) Broken Crayons Knife or Vegetable Peeler Hairdryer Paper Plate Directions: Peel any paper off of the crayon, and begin to shave wax curls from the side of the crayon.  You can do this by pressing and sliding the knife or peeler along the crayon as you would chocolate while baking.  Make sure the curls fall onto the paper plate! Remove the top metal piece of the glass ornament.  Bend the plate to make a spout and pour the curls into the ornament.  I like to fill mine about 1/4 to 1/3 of the way full, but it is totally up to you to decide how full you would like the sides of the ornament to look! Reinsert the metal piece in the top of the ornament.  With the hairdryer on low to medium speed, begin to heat up the ornament.  Shake and rotate periodically to fully coat the inside.  Be careful, it gets very hot! Place a hook on the ring, hang on the tree, and thank me later!